To import a Submissions batch file
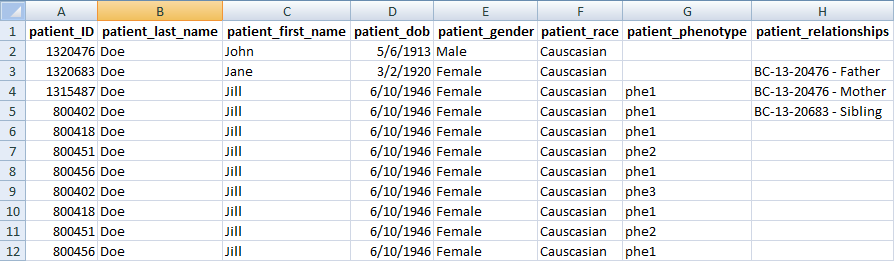
You use a batch import process to add multiple patients in a single step to the Geneticist Assistant Customer Portal. The batch import file must be either a comma-separated values (.csv) file, a tab-delimited text (.txt) file, or a tab-separated values (.tsv) file. The file must contain the following columns of information in the order listed—the patient ID, the patient last name, the patient first name, the patient date of birth, the patient gender, the patient race, the patient phenotypes, and the patient relationships. Patient relationships must in the format patient ID-Relationship, for example, ABS17-Father. Multiple phenotypes and multiple relationships must be separated by semi-colons. If your import file does not follow either the standard column order or the standard column names, then you must manually indicate the order of the columns in your file.
Standard column order and names
1. On the Geneticist Assistant main menu, click File > New Patient.
The Add New Patient dialog box opens. The Add Patient tab is the opened tab.
2. Click the Import Submissions tab to open it.
3. Specify the properties of your Submissions file.
Property | Description |
|---|---|
Add New Phenotype Terms in File Automatically | Selected by default. If the patient file contains phenotypes that have not already been added to the Geneticist Assistant database either through the Manage Objects function (see Managing Objects in the Geneticist Assistant Database), or the Add Phenotype option on the Add Patient tab (see Patient tab, Patient sub-tab, Phenotype pane), then leave this option selected to automatically add these phenotypes to the database. Otherwise, clear this option. |
Data Delimiter | Indicate the delimiter used (Comma or Tab). |
Date of Birth Format | Select the format used for the patients’ birthdays. |
File Column Format | Select one of the following to indicate the file format. • File follows standard column order. • File follows standard column names. • File does not follow above standards. I want to specify. |
4. If your file follows the standard column order or the standard column names, go to Step 7; otherwise, if your file does not follow either of these standards, go to Step 5.
5. In the Result pane, rearrange the column headers so that they are in the same order as the column headers in your patient file.
For information about rearranging columns, see To rearrange the order of data columns. |
6. Click Check With File.
• The file is loaded and the patient information is displayed in the Result pane. If your file format is correct, go to Step 7.
• If your file format is incorrect then, you must click Incorrect, Redo, and then make the necessary changes to the column headers. Click Check With File again to verify that your file has the correct format. Only after you verify that your file has the correct format can you continue to Step 7.
7. Click OK.
The Add New Patient dialog box closes. The patients, and if applicable, any new phenotypes, are imported in to the Customer Portal.