FAQ - Frequently Asked Questions GeneMarker® FAQ
Please review the questions and answers below. If you still need further help please contact us.

Frequently Asked Questions for ChimerMarker
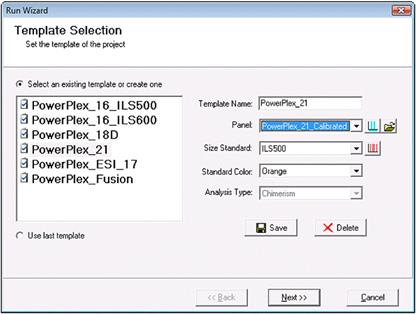
- What is a CHM Panel?
Part 1: Chimertyping Panel
The CHM panel, short for "Chimertyping Panel," is a project-specific panel created during data processing. The CHM panel is required for chimerism analysis.

Part 2: Genotyping
The Chimertyping Panel is derived from the Genotyping Panel. Only bins shared by either the donor or recipient are saved; the others are discarded.
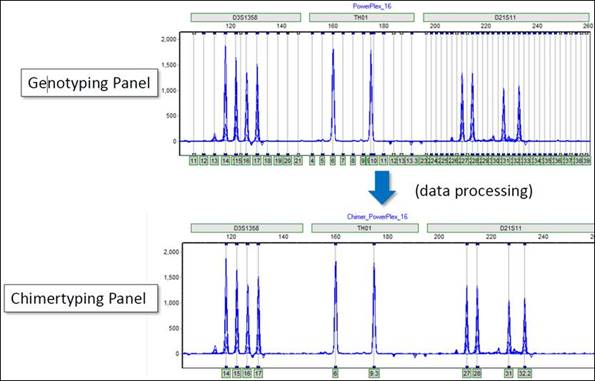
Part 3: Viewing
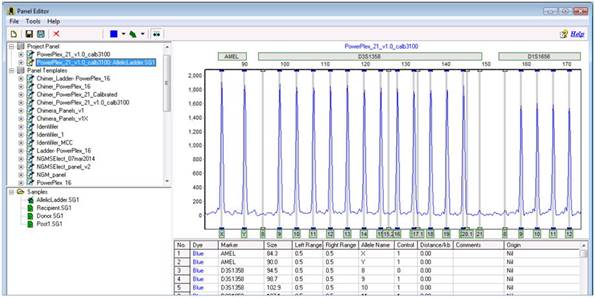
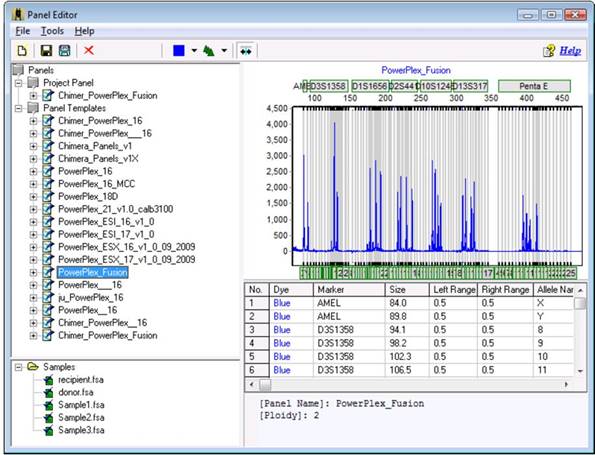
The Chimertyping panel can be viewed in the panel editor (Tools > Panel Editor). The Chimertyping panel for your current project appears under "Project Panel."

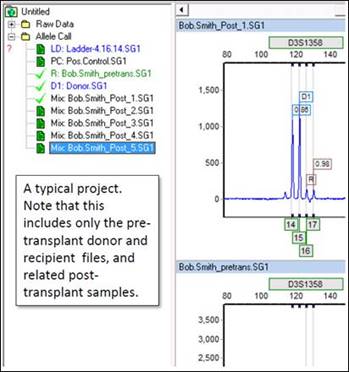
- How many recipients can I analyze at a time?
One. Because the Chimertyping panel is project-specific, only one donor/recipient group can be analyzed at a time. This includes the pre-transplant donor and recipient files, and any number of post-transplant (mixture) samples. You may also include positive controls, negative controls, and ladder samples.
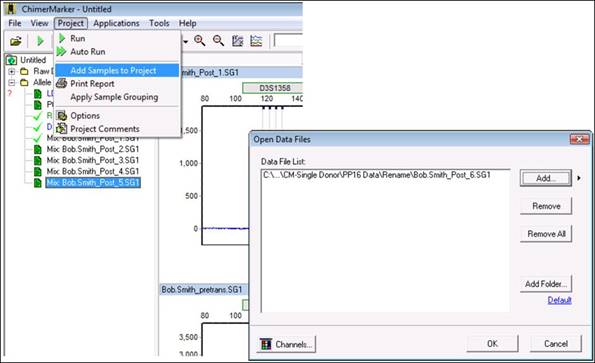
- How do I add samples to an existing project?
Open the project (File > Open Project) and click "Project > Add Samples to Project." Click "Add," and then navigate to the sample(s) that you want to add. After clicking "OK," the program will analyze the new samples using the analysis parameters saved in your project.
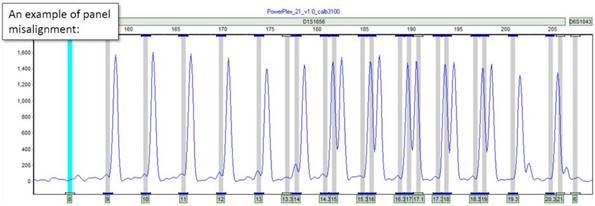
- How do I calibrate my panel?
Part 1
Sometimes, particularly after running a new chemistry or maintaining your CE instrument, you may notice some amount of misalignment between your genotyping panel and your CE files. This can be an issue because when processing data, peaks may not "fall" into their correct bins, or they may be missed entirely. However, ChimerMarker provides a series of easy steps that allow the user to automatically calibrate their genotyping panel using an Allelic Ladder sample.
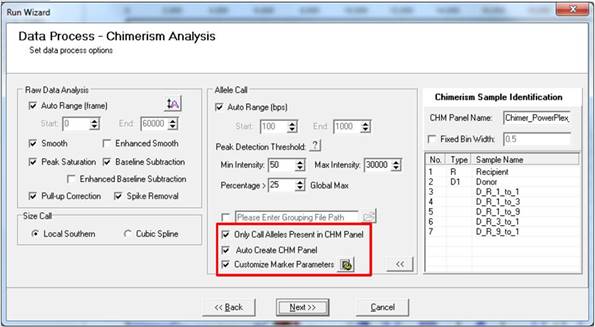
Part 2
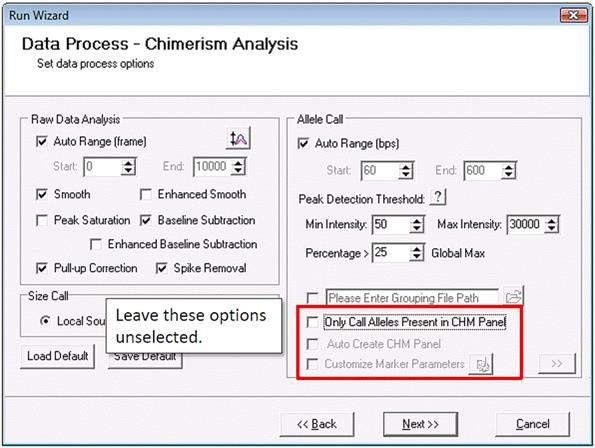
Begin by reprocessing your samples. This time, in the second page of the Run Wizard, deselect "Only Call Alleles Present in CHM Panel" and "Auto Create CHM."
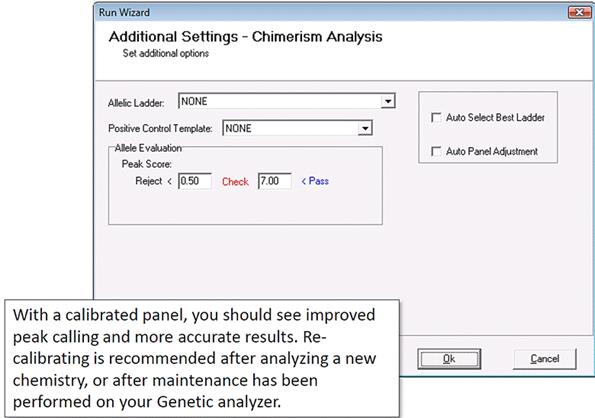
Part 3
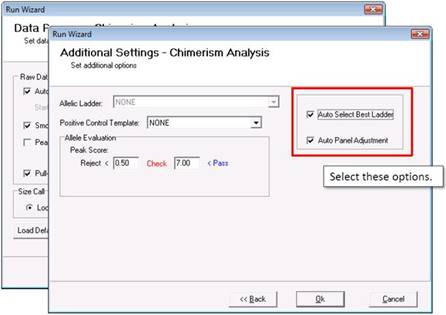
In the last page of the Run Wizard, select "Auto Select Best Ladder" and "Auto Panel Adjustment."
Part 4

Part 5
The panel editor contains all of the panel files saved in ChimerMarker. In the file tree to the left, a section called "Project Panels" contains the panels used to process your current project.
Part 6
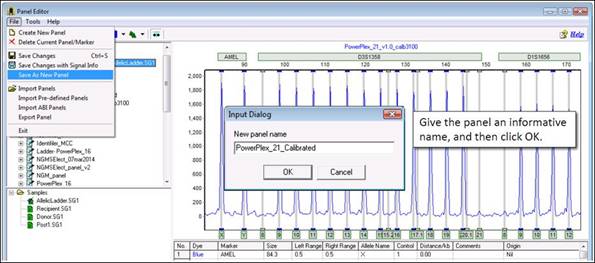
You should see two or more project panels the original panel you used to genotype your samples, and another panel, appended with your ladder name. The second panel is the calibrated panel. To save it, select it and navigate to File > Save As New Panel.
Part 7
To reprocess your samples with this new calibrated ladder, reopen the Run Wizard (Project > Run) and select your new calibrated panel from the panel drop-down menu.
Part 8
In the second page of the Run Wizard, select "Only Call Alleles Present in CHM Panel," "Auto Create CHM Panel," and "Customize Marker Parameters" to perform chimerism analysis.
Part 8
In the final page of the Run Wizard, do not select "Auto Select Best Ladder" or "Auto Panel Adjustment," which was already done. Click "OK."
- Why are some informative loci being ignored?
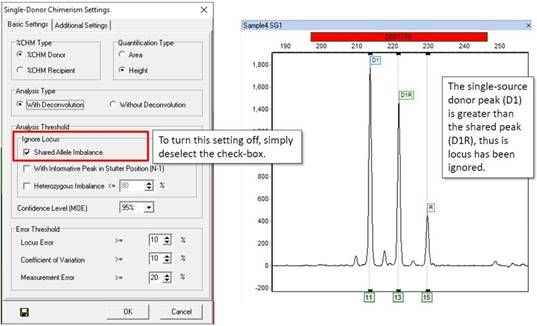
Part 1
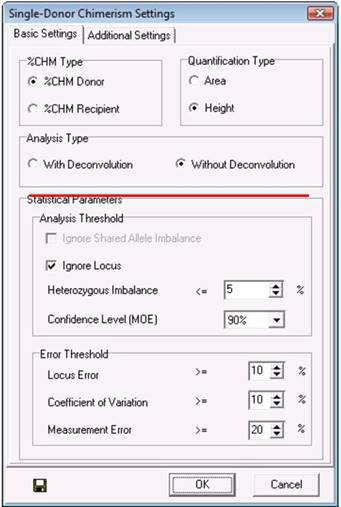
This is usually related the settings that were chosen in the Chimerism Settings window. An example is shown below:
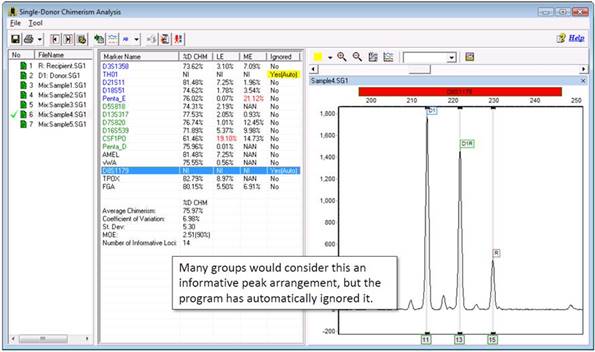
Part 2
The "Ignore Shared Allele Imbalance" filter will ignore any locus in which a single source peak has greater RFU than a shared peak. As a result, the marker pictured below was ignored.
Part 3
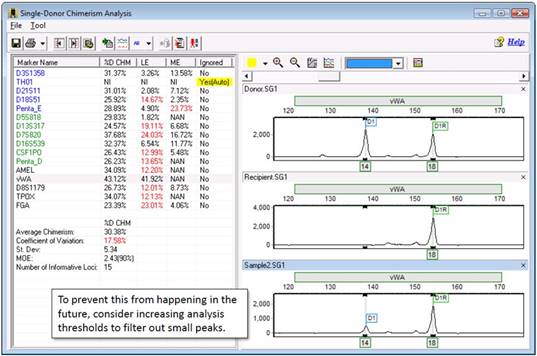
Here is another marker that is being ignored for no obvious reason:
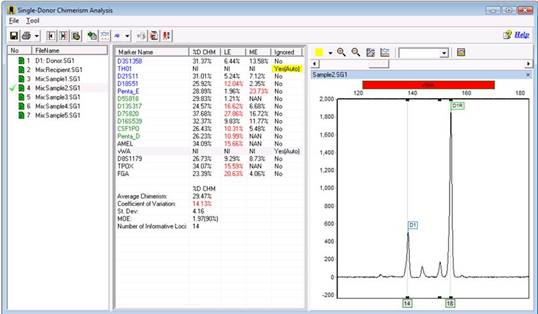
Part 4
You can navigate back to the main analysis screen to look at this marker in more detail, or while in the chimerism analysis screen, you can use the "Multi Sample View."
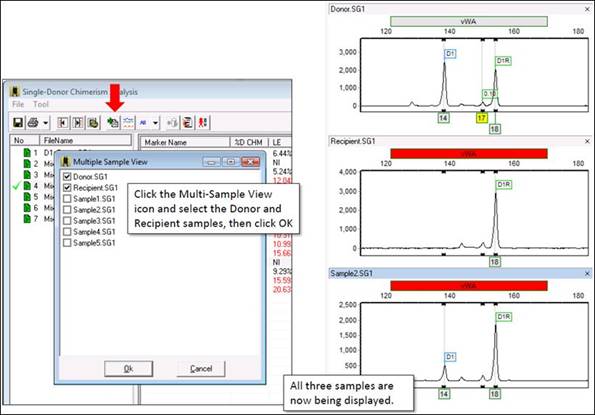
Part 5
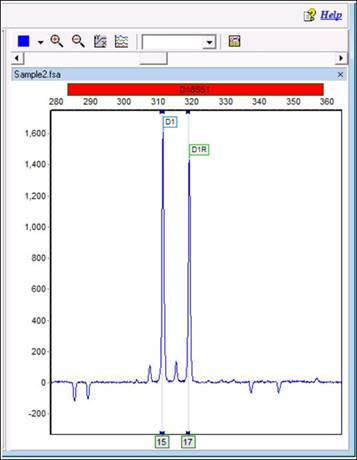
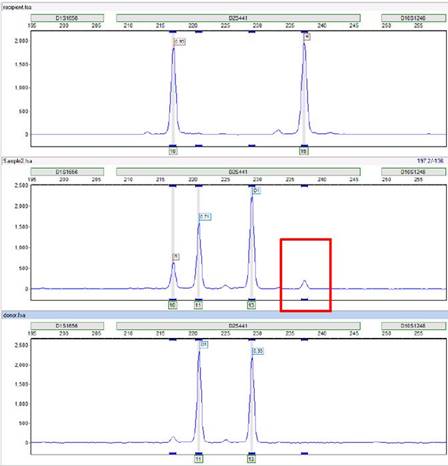
With all three traces displayed, the issue becomes clearer: the donor sample has three peaks! ChimerMarker cannot use this marker because it is expecting only one or two peaks from the donor (and recipient). The main issue is that the program has created a Donor bin at the site of this peak. Even if you delete the peak, the bin will remain. Therefore, you must delete the peak from the panel.
Note: The program has not only called a third donor pear (17), but it has also added a donor bin at this location. This is because the CHM panel is created based on donor and recipient allele calls.
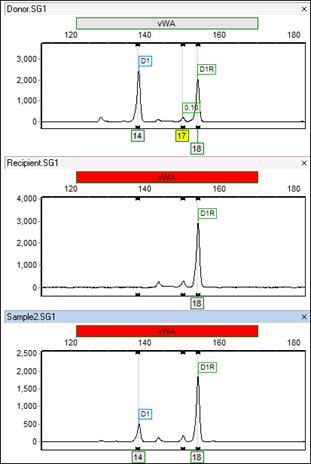
Part 6
The Chimertyping panel can be viewed in the panel editor by clicking "Tools > Panel Editor." The Chimertyping panel for your current project display under "Project Panel."
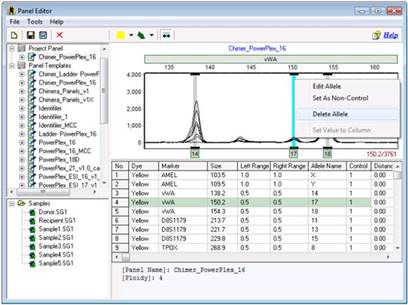
Simply right click on the extra bin and select Delete Allele. Save the changes by clicking the Save icon.
Part 7
After deleting the peak, saving the changes, and exiting the panel editor, the results will be updated immediately. Now the program no longer ignores the marker.
Part 8
The following is a third common example of a marker being ignored. In this case, the only alleles that were called were 15 and 17.

Part 9
Our first impulse may be to blame the shared allele imbalance filter discussed in Part 2. However, even with this option deactivated, the marker will still be ignored. In this special case, only two alleles were called. Thus, when the program tries to deconvolute the shared peak, it can use only the height of D1 as a reference. However, D1 is taller than D1R! As a result, the deconvolution results in a negative number and the calculation fails. As a result, the program cannot use markers with peak orientations like the ones shown.
- Why aren't some peaks being called?
Part 1
Occasionally, you may notice that certain peaks, or even entire markers, aren't being called by the program:

Most commonly, this is because your panel needs to be calibrated. For more information, see the FAQ "How do I calibrate my panel" parts 1 - 9. If you confirmed that your panel is calibrated and peaks are still being missed, your analysis filters might be set too high.
Part 2
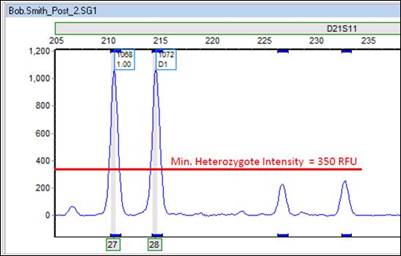
For example, the two rightmost peaks below are not being called, despite the obvious presence of allele bins directly underneath them:
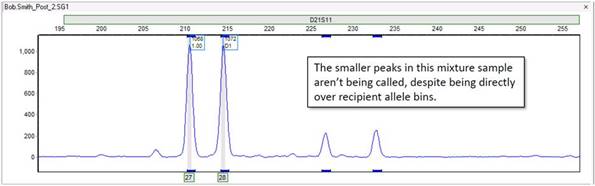
Thus, it is likely our analysis settings that are filtering them out. These peaks are within a marker D21S11. Therefore, you must check the marker-specific settings for D21S11 in the panel editor (Tools > Panel Editor).
Part 3
Click on your panel from the file tree to the left. Right-click on a marker label (grey rectangle) and select Edit Marker to open the marker-specific settings.

Part 4
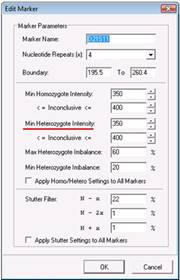
The following figures show marker-specific settings for D21811. In this case, the Min Heterozygote intensity is set to 350 RFU, which is well above the two smaller peaks.
Part 5
After lowering the threshold to 200 and saving the results, the peaks are now called, as excepted.
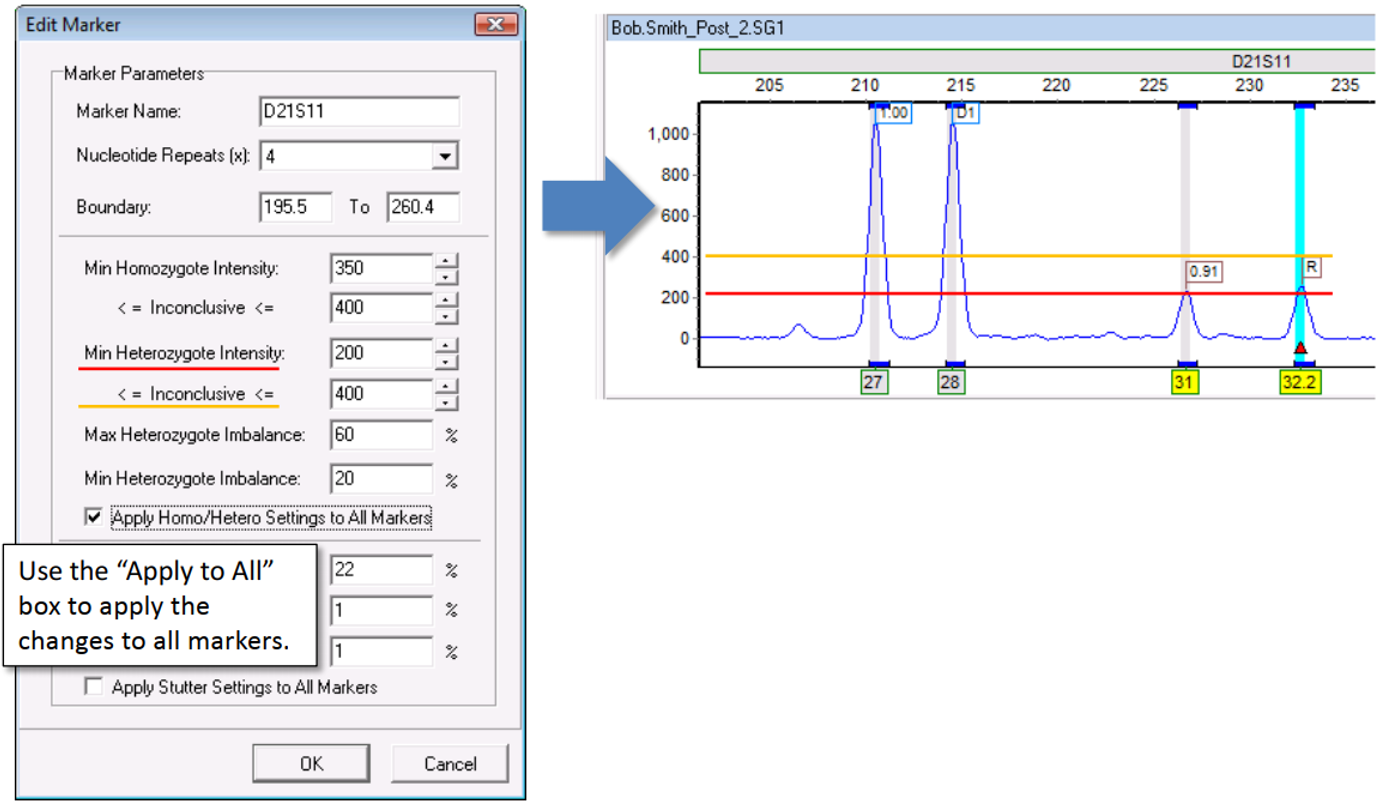
Note: These peaks are flagged yellow. This is because despite being above the Min Heterozygote intensity, the peaks are still below the upper range of 400 RFY and are therefore still in the inconclusive range.
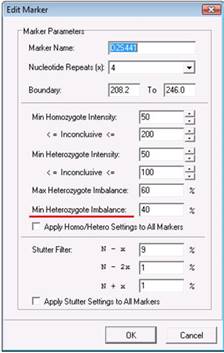
Part 6
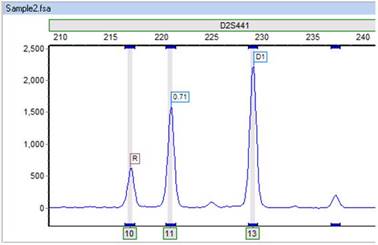
Here is a second example. Why isn't the small peak in Sample2 being called? You can clearly see a recipient bin directly under the peak. Again, you should check the marker-specific panel settings for this locus.
Part 7
Here, it is the Min Heterozygote imbalance filter, set currently at 40% that is preventing this peak from being called. In this case, the peak is above the 50 RFU threshold of the Min Heterozygote Intensity filter. However, you may observe that this recipient peak is significantly shorter than the other recipient peak.
Part 8
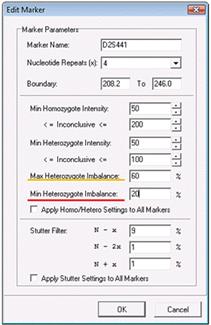
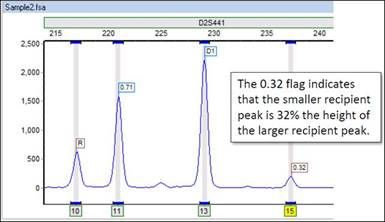
After lowering the Min Heterozygote Imbalance filter to 20%, saving the changes, and reprocessing the data, you can see that the peak is now called. Furthermore, you can see that the smaller peak is actually 32% the height of the other recipient peak, as indicated by the 0.32 flag. Note that the peak is flagged yellow because 32% still puts the peak in the inconclusive range defined here as being lower than 60%.
Part 9
As mentioned in What is a CHM Panel? - Part 1: Chimertyping Panel and Why aren't some peaks being called? - Part 3, the Chimertyping panel (prefix: Chimer) is a project-specific panel derived from the original genotyping panel. If you choose to modify panel settings, modify the original genotyping panel, save the changes, and then reprocess your samples. By modifying, the genotyping panel directly, all derivative Chimertyping panels will reflect the changes. However, if you modify the Chimertyping panel, you will see improvements in that specific project only.
- What is Deconvolution?
"With deconvolution" and "Without deconvolution" are both options in the Chimerism analysis settings window. When "With Deconvolution" is selected, the program will use shared peaks (D1R) in its chimerism calculations. When "Without Deconvolution" is selected, shared peaks will not be considered when calculating the chimerism percentage, which may lead to fewer informative markers.
- How many recipients can I analyze at a time?