CELL LINE AUTHENTICATION
CELL LINE AUTHENTICATION is essential and required for many funding and publication venues
Recent publications have shown that a substantial portion of cell lines are either contaminated or misidentified entirely. In response, the UICC has understandably re-emphasized the need for Cell Line Authentication. Several commercial PCR kits are now available for this purpose, including Promega's GenePrint®10, GenePrint®24, PowerPlex®16, and PowerPlex®18D systems, as well as Thermo Fisher Identifiler® and GlobalFiler® systems.
To assist with the analysis, GeneMarker® HID software is equipped with an embedded Cell Line Authentication application. The user may compare their sample's STR profile against a database of reference genotypes using a percent-match calculation. The tool is built into the program – the user can simply upload their raw data from any ABI®PRISM, Applied Biosystems SeqStudio™, Promega Spectrum Compact CE Systems, or a rapid system (such as RapidHIT™ and RapidHIT™ID), genotype their samples, and then proceed directly to Cell Line Authentication. No additional data transfer is required.
Figures 1 – 5 (below)
The embedded cell line authentication tool removes the error prone step of transferring data from genotyping software to a cell line authentication web site or spread sheet.
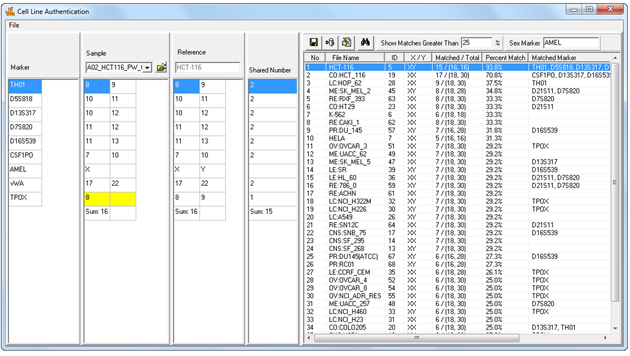
Figure 1: Cell Line Authentication Main Window. Samples are automatically imported from the user's current project - no manual entry required. Select a sample from the sample dropdown menu to search the database. Results are displayed in the table to the right.
Building Your Database
The Cell Line authentication application is equipped with a built-in database function. This database is seeded with 60+ common cells lines, but can be easily and rapidly expanded to include thousands of references.
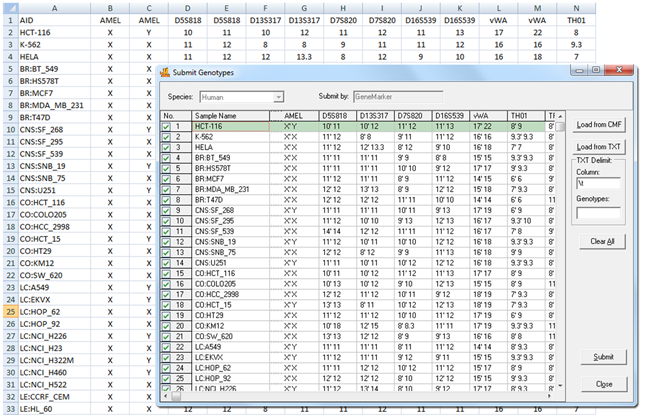
Figure 2: This image shows uploading of a database of cell lines into GeneMarkerHID software. These samples will be saved to the database where they can be reviewed, deleted, or modified using GeneMarkerHID software's database management tools.
Perform Genotyping
To run a new project, simply load your raw data files and use the GeneMarkerHID Run Wizard to perform size and allele calling. Settings can be saved as templates, greatly simplifying the analysis.
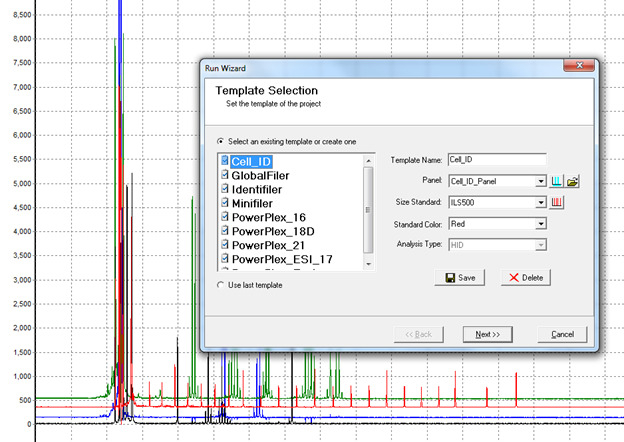
Figure 3: Processing raw data using the Run Wizard
Review and Export Electropherograms
Reports can be saved using GeneMarkerHID software's many exporting and printing options.
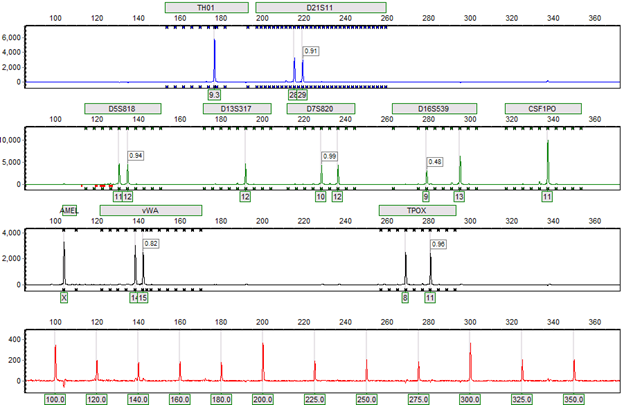
Figure 4: Completed genotyping results
Query the Database
After genotyping, proceed directly to the Cell Line Authentication application. Sample genotypes obtained from your current project will be imported directly into the Cell Line window (no manual entry required). Simply select a sample from the sample dropdown menu to query the database. You may also set the minimum percent match threshold for the search. Results are displayed in the report table to the right.

Figure 5: Samples from your project are automatically imported into the application. Select a sample from the Sample dropdown menu to search it against the database. Clicking on a result will display that reference's genotype in the ‘References Table’, allowing side-by-side comparison with the sample genotype. Differences are flagged for easy identification.
Application Notes: